
Other
How To Make Floating Candles | DIY Floating Candles At Home
Jun
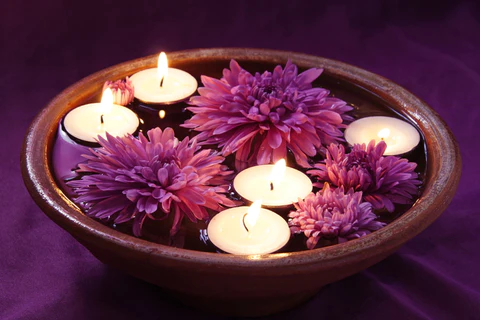
Floating candles are little candles that float on the surface of the water. They’re a complement to a dining table for special occasions, and they give whatever place they’re in a fantasy-based appeal. Fortunately, making these candles at home isn’t difficult.

You can make them as large or as tiny as you like, and you can fragrance them with whatever scent you want. Floating candles are a decor item to remember if you’re planning a dinner party, wedding, or seasonal celebration.
How To Make Floating Candles At Home
Candle-making supplies can be acquired from an arts and crafts store or bought right from Jindeal INC. Depending on the size and number of candles you want to make, you’ll need a different quantity of each item.
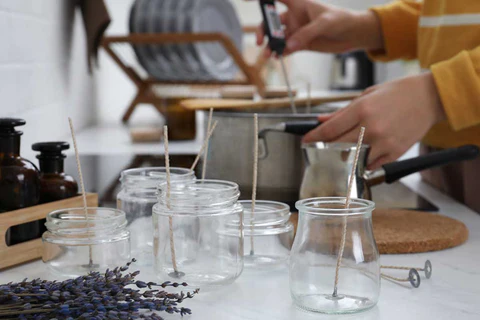
DIY Floating Candle Supplies:
- Semi Refined Paraffin Wax – 226 Gm
- Candle Colour Powder – 1 Tsp.
- Essential Oil – Few Drops
- Pre-Waxed Candle Wicks
- Metal Candle Wick Holder
- Candle Jars
- Baking Tray Mold
- Double Boiler
- Thermometer
Know About Floating Candle Making Supplies
Discover how to build floating candle centerpieces for your next event or special occasion. By changing the color, scent, and decorations for the vessels, you can easily personalize these centerpieces to fit the theme of your event. Read on to find out more about the candle-making materials that are required to make floating candles.
- Semi Refined Paraffin Wax: Semi Refined Paraffin Wax is the most generally utilized wax among candle companies since it can retain a lot of smell and color. It also comes in a variety of melt degrees, making it suited for a wide range of candle varieties. Whether you are a newbie to the world of candle-making or a veteran – this wax can be ideal for you.
- Candle Coloring Dye: Candle dye comes in a wide range of brilliant hues to suit your candle-making needs. Make sure you always use high-grade powders. These candle colors are made with strong pigment to give the precise color you want. Choose a color of your liking and make your floating candles even more vibrant.
- Candle Jars: Glass candle jars are the perfect container to put your floating candles in. Floating candles placed in these will create the perfect and elegant atmosphere for a dinner party.
- Essential Oils: A candle infused with essential oils can produce a sense of serenity and well-being and act as a potent anxiety and stress reliever. The soothing lighting and the aroma of essential oils burning will help to center your mind and make you feel more peaceful and relaxed.
- Baking Tray Mold: The size of the candles will be determined by the size of the mold. Small muffin tray candles will last around an hour when lit. Candles on a large muffin pan will burn for around three hours. Tart molds and cookie cutters can also be utilized, as long as there is a molded slot for the candle to sit in.
- Pre-Waxed Candle Wicks: Wax Coated Candle Wicks can be used to manufacture a number of different types of candles. These cotton candle wicks are pre-waxed and emit very little smoke, making them perfect for household use. They’re also constructed so that they burn for longer, don’t curl, and don’t leave cotton ashes behind.
Make Homemade DIY Floating Candles – Step-by-step
While many of us use candles to create a peaceful bubble bath, others simply want them to float around romantically while having dinner with a loved one. Read on to find out how you can create your magical floating candles.
Step 1: Place The Wax In the Double Boiler
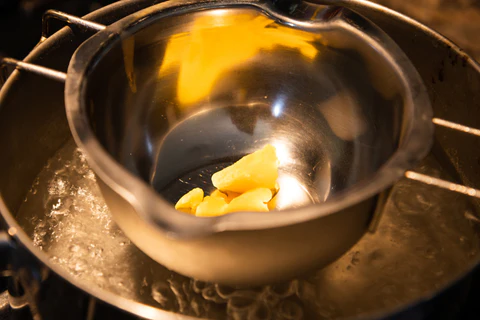
While heating your wax, a double boiler or a hot plate will suffice. If you’re using a double boiler, start by heating the water outside before adding the wax. Then, fill a bigger pot halfway with water and place a smaller pot in the center to create a double boiler. Whatever is within the smaller pot will be heated by the boiling water on the outside.
Step 2: Heat The Wax

To pour semi-refined paraffin wax, it must reach a temperature of 150 degrees Fahrenheit. Place a thermometer in the wax to check the temperature for complete accuracy. Check the consistency of the wax often. You can accomplish this by gently swirling the wax with a wooden spoon in the boiler pitcher.
Step 3: Mix The Candle Color and Essential or Fragrance Oils
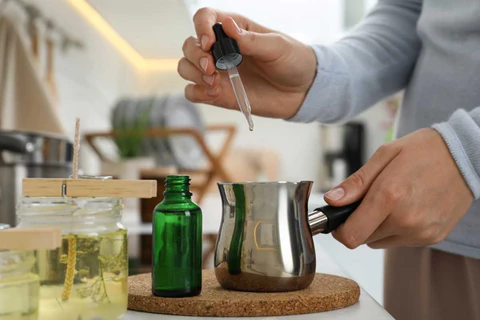
Candle Colors will provide nice color to your candles. For a vibrant color, one teaspoon of pigment per candle should be enough. It’s critical to add color while the candle wax is still warm. To ensure that the pigment in the candle is uniform, mix it with a wooden spoon.
Step 4: Spray Your Tray With Cooking Spray
If you don’t spray your mold with cooking spray or petroleum jelly before using it, your candles will be difficult to remove. Because you’ll be lifting them by their fragile wick, you’ll want to reduce resistance as soon as possible. Spray the bottom of each mold slot equally. Being thorough now will save you time and aggravation later.
Step 5: Pour The Wax
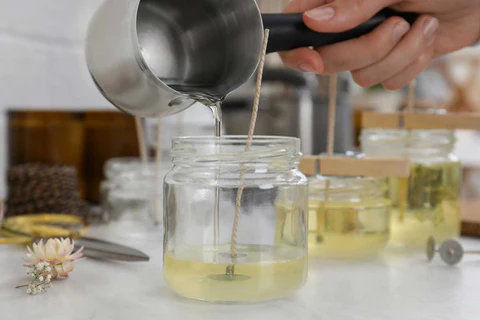
Pick up the pitcher with wax once the heat has been turned off. Pour it into each of the holes in the mold, making sure the wax is dispersed evenly. Slowly and steadily pour. The wax will be hot, and you may injure yourself if you pour it too rapidly.
Step 6: Place The Wick
Allow the hot wax to cool and settle for a few minutes. You should be able to add wicks from there to make them stand up firmly. Pre-Waxed wicks are easier to insert and can stand firmly.
Step 7: Let The Candles To Harden
Candles might take up to two hours to harden entirely once the wicks have set. Set them aside and do something else to pass the time until they settle.
Step 8: Remove The Candles
Pull your candle up carefully using the wicks once it has enough time to settle. Once the candles have been retrieved and ready to set, wipe away any excess muck with a paper towel.
If you try to pull the candles out too quickly, they will become more difficult to extinguish. If you’ve made this error and wish to correct it, freeze them for a few minutes, remove them and try again.
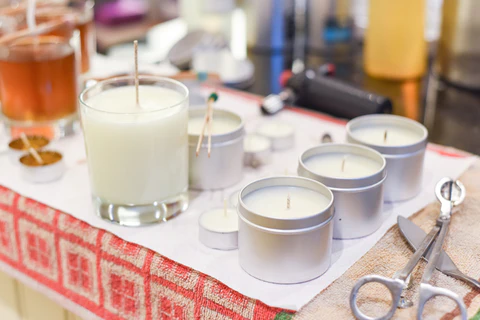
Step 9: Present Your Candles
Once you have successfully pulled out your candles from the mold, take the candle jar and fill them with water. Place the candles in the water, and you will see that they float. Light them up, and your candles are ready to fire.